

Did you know that over 2 billion people worldwide lack access to safely managed drinking water? Yikes! But here’s some good news – you can take control of your water quality with a DIY slow sand filter. These ingenious systems have been purifying water for over 200 years, and now you can build one right in your backyard! In this guide, we’ll walk you through the process of creating your very own slow sand filter, ensuring you have access to clean, safe water without breaking the bank. Let’s dive in and get our hands dirty!
What is a Slow Sand Filter?
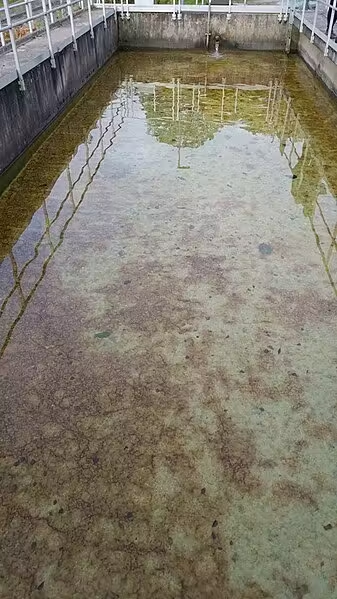
Slow sand filters filter water using sand, gravel, and a biofilm called Schmutzdecke. They have been around for just under 200 years now and were instrumental in stopping the spread of diseases like cholera and typhoid in 19th-century Europe and America. Water is added to the filter to the point that it covers the sand and slowly filters out the bottom, and within 10 to 20 days on top of the water will slowly form a biofilm known as Schmutzdecke.
The heart of the filter is the Schmutzdecke, a top layer of beneficial microorganisms that plays a crucial role in the purification process. Although considered ‘primitive’, slow sand filters are remarkably efficient, slow sand filters can remove up to 99.9% of pathogens without the use of chemicals, making them an eco-friendly choice for clean water. They provide potable water and are useful for off-grid homes and remote communities.
What sets slow sand filters apart are their low maintenance requirements and long-term effectiveness, operating without electricity or artificial additives which can be a serious problem solver for those looking for clean water off the grid. Let alone the fact that they are by far the cheapest filtration method out there and have been a major source of potable water in developing regions.
Materials Needed for Your DIY Slow Sand Filter

Materials Needed for Your DIY Slow Sand Filter
- Container: Food-grade plastic barrel or concrete tank 200-400litre(50-100 gallons)
- Sand: Fine grain sand (0.15-0.35 mm), washed and sifted
- Gravel: Various sizes for drainage layers (1/4 inch to 1 inch)
- Piping: PVC pipes for inlet and outlet systems
- Diffuser plate: Perforated material to distribute water evenly
- Valves: For controlling water flow
- Tools: Drill, saw, measuring tape, and level
- Optional: Activated carbon for enhanced filtration
A DIY slow sand filter project I think is genuinely achievable for anyone and is a shockingly simple way to provide clean, safe water for yourself. The main house for the filter will be your barrel/container, in most cases for at-home setups it will be a food-grade 50-gallon barrel, layers of gravel in varying sizes create the bottom layer on which the washed and sifted fine sand is laid. PVC piping for the inlet and outlet, along with a diffuser plate, ensures the water is evenly dispersed throughout the barrel. Control valves regulate water flow which is important as a level of water must always be maintained to keep the biofilm intact. For those seeking extra purification, activated carbon can be added as an optional layer.
Step-by-Step Guide to Building Your Slow Sand Filter
For this step-by-step guide, I will use a 55-gallon(210-liter) Drum, probably the easiest to find and at a food-grade level. From preparing and cleaning your barrel to set up and the ripening process for your schmutzdecke, this guide will cover everything you need to get your slow sand filter working.
Remember there are only fundamentals that you do need to follow if you are new to DIY, I recommend following step by step but if you are brave enough play around with what you have at your disposal and don’t waste cash.
- Prepare the 55-gallon drum: Clean the drum thoroughly with soap and water, rinse well and let dry completely. Then drill a 3/4-inch hole 2 inches from the bottom for the outlet pipe.
- Install the outlet pipe: Cut a 2-foot length of 3/4-inch PVC pipe, and insert the pipe through the drilled hole, leaving 6 inches inside the drum. Seal around the pipe with food-grade silicone sealant and attach a ball valve to the external end of the pipe
- Add the drainage layer: Place 4 inches of 1-inch gravel at the bottom of the drum, add 3 inches of 1/2-inch gravel on top, and layer 2 inches of 1/4-inch gravel as the final drainage layer.
- Layer filtration media: Add 24 inches of fine sand (0.15-0.35 mm grain size), gently compact each 6-inch layer as you add it, and make sure the sand surface is level.
- Install the inlet and diffuser plate: Cut a circular piece of perforated plastic slightly smaller than the drum’s diameter, and drill small holes throughout the plate for even water distribution. Install the plate 6 inches above the sand layer using food-grade silicone. Cut a hole in the drum lid for a 1-inch PVC inlet pipe and install the inlet pipe, ensuring it sits just above the diffuser plate.
- Add water and initiate the ripening process: Slowly fill the filter with water until it’s 2 inches above the sand layer and allow the filter to sit for 2-3 weeks to develop the schmutzdecke layer. Maintain the water level during this period.
When the water starts to slow down, clean the filter drain and rinse, removing the schmutzdecke and an inch of sand off the top before repeating step 6. After a few cleanings when about half the sand is gone, replace all the sand again and start from step 4 again.
I recommend using a basic home water test kit, which typically checks for bacteria like E. coli and, pH levels, nitrates, and chlorine. Rather be safe than sorry.
Maintaining Your Slow Sand Filter
After you have constructed and set up your slow sand filter, there generally is—or should I say shouldn’t be—much maintenance involved. However, I do think it’s still essential to monitor water levels and flow rates, adjusting if needed. When the water flow drops off dramatically, it’s time for a cleaning by scraping the top inch or so of sand off and then allowing the Schmutzdecke (the biofilm layer) to regrow. This process, known as “harrowing,” is the most vital part in making sure your filter works properly.
Be prepared to troubleshoot issues like clogging or inadequate filtration. For long-term care, plan on replacing all the sand and overhauling the system every few years, depending on your source, water quality and usage. This complete rejuvenation ensures continued effective water purification and better flow rates so less adjustment is needed to keep the filter at a good level of water.
Remember to test the water quality after each of these maintenance overhauls. Use a comprehensive water testing kit to check for pathogens, turbidity, and other contaminants. This is vital in making sure you’re producing safe, potable water.
Understanding the Science Behind Slow Sand Filtration
Before writing and further researching this article I thought it was only the physical and biological filtration that occurred, but there is also chemical filtration that occurs. I will say it isn’t the star of the show but I’m still impressed to find that it helps soften the water through absorption and ion exchanges, effectively removing high concentrations of minerals like magnesium and calcium.
The real star of the show is still the schmutzdecke, this biofilm is teeming with beneficial microorganisms, a powerhouse of the filter, trapping and consuming pathogens and organic matter. It’s a prime example of bioremediation in action.
Physical filtration occurs as the water slowly sieves its way through the fine sand at about 0.1-0.3 meters per hour, leaving behind all suspended solids and bacteria for the schmutzdecke to consume.
The fact that natural processes like this can remove turbidity, pathogens, and even some dissolved contaminants is a truly amazing way of mimicking nature’s purification processes.
Enhancing Your DIY Slow Sand Filter
Enhancing your slow sand filter is even easier than setting it up and is worth the effort making it more effective for various water sources and conditions.
- Activated carbon layer: The most popular upgrade is to run it through activated charcoal either after the sand bed, the activated charcoal excels at at removing unpleasant tastes, odors, and certain chemical contaminants.
- Pre-filtration stage: If you are dealing with highly turbid water, placing a rough sand filter or any course media before the slow sand filter will help save the lifespan of your filter and stop clogging up the system.
- UV sterilization: This is a more expensive and sophisticated layer of sterilization but nonetheless is another layer of pathogen elimination and great for questionable water sources.
- Aerator: Will allow for more airflow, increasing dissolved oxygen which in turn leads to a healthier schmutzdecke and potentially improving biological filtration
- Multi-media filtration: Experimenting with multi-media filtration by adding layers of materials like anthracite or garnet can improve the filter’s ability to handle different contaminants.
- Automated monitoring: For the tech-savvy and/or bored, implementing an automated monitoring system can help track flow rates and water quality in real-time, ensuring the best performance and in my opinion would be a pretty cool end goal for this system as far as current technology and simplicity dictates.
- Rainwater harvesting integration: Integrating with a rainwater harvesting tank can allow for a streamlined gravity-fed system and with gutter guards and first flush filters protecting your rainwater tank your slow sand filter won’t take too much of a hit.
Any or all of these can exponentially enhance and improve your slow sand filter, leaving you with a robust, multi-stage water treatment system capable of taking on a wide range of water quality challenges.
Testing and Ensuring Water Quality
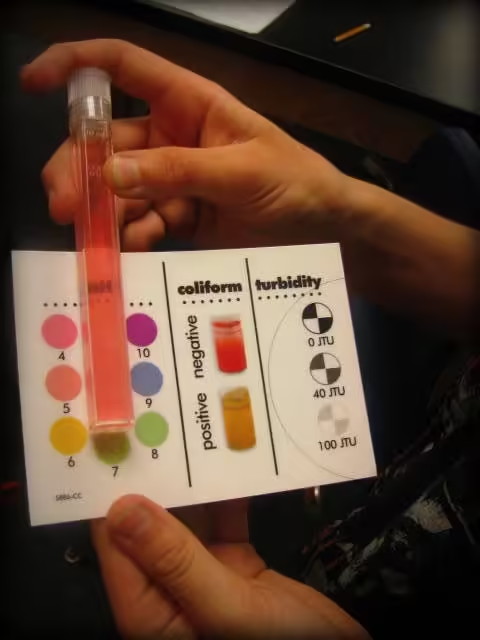
Ensuring the quality of the water produced by the slow sand filter cannot be understated. Start with basic readily available home testing kits that check for basic indicators like bacteria, pH levels, and chlorine residuals. To be completely certain of the quality of water you’re producing you can send a sample to a certified lab, they can screen for a wider range of contaminants, including heavy metals, pesticides, and other harmful microorganisms that home kits might miss.
- Microbiological testing is particularly important as it detects potentially dangerous pathogens like E. coli and coliform bacteria.
- Chemical analysis helps identify dissolved contaminants that could affect taste, odor, or health.
- Monitoring pH levels ensures the water remains balanced and safe for consumption.
I recommend testing your water with an at-home test kit throughout the year and getting a lab test done after every overhaul is conducted on the filter. Remember that even though slow sand filters are highly effective they are not infallible and regular testing is the best defense against potential water quality issues.
There you have it, folks! With this guide, you’re now equipped to build your very own DIY slow sand filter and take a big step towards water independence. Remember, clean water isn’t just a luxury – it’s a necessity for health and well-being. By creating your slow sand filter, you’re not only ensuring safe water for yourself but also joining a global movement towards sustainable water solutions. So roll up those sleeves, gather your materials, and get ready to filter your way to cleaner, safer water. Your future self (and your taste buds) will thank you!